If you are new to print, bleed, trim, safe area, and cut tolerance can sound like four different ways a printer plans to annoy you. They are actually the buffer system that keeps a printed piece looking normal after it gets cut. Once you understand bleed, trim, safe area, and cut tolerance, a lot of file setup instructions stop feeling weirdly hostile.
Print is physical. That is the whole game.
A printed piece usually starts on a larger sheet, then gets trimmed down to its final size. That trimming is precise, but not magic. Sheets can shift a little. Stacks can move a little. Cut paths can vary a little. Good print production plans for that reality instead of pretending every cut lands on the exact same molecule.
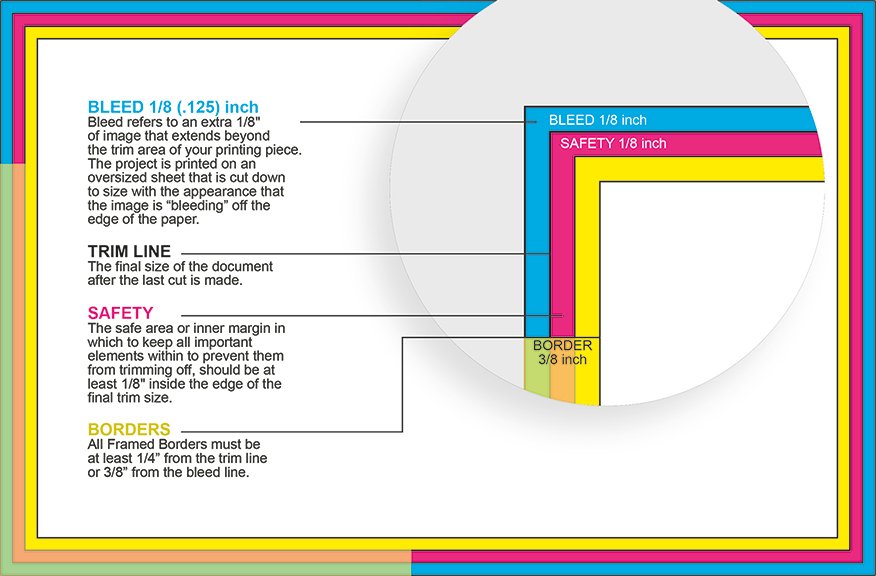
What Bleed Means
Bleed is the extra artwork that extends past the final edge of the piece.
If your background color, photo, texture, or pattern is supposed to go all the way to the edge, it should not stop at the finished size. It needs to keep going beyond that edge so the printer has room to trim cleanly.
This is why a printer may ask for a file that is slightly larger than the final product. That extra edge area is not a mistake. It is the insurance policy.
If you do not add bleed, even a tiny shift during trimming can leave a thin white sliver on one side. And yes, that tiny sliver will suddenly become the only thing anybody notices.
For a lot of common small-format print jobs, 1/8 inch bleed on each side is a normal starting point. But the printer template still wins. Labels, die cuts, rounded corners, large signs, and odd materials can all have different requirements.
What Trim Means
Trim is the final intended size of the printed piece after cutting.
If you order a standard business card, the trim size is the finished size you expect to hold in your hand. Same idea for postcards, flyers, invitations, rack cards, and a lot of other print pieces.
Everything outside the trim line is there to help production. It is not part of the finished piece.
That matters because people often build a file at the final size, then wonder why the printer wants more. The answer is simple: the finished size is not the full working size.
What Safe Area Means
Safe area is the zone inside the trim where important content should stay.
This is where your key text, logos, phone numbers, QR codes, and other essential details belong. The safe area gives those elements breathing room so they do not get clipped or look awkwardly crowded near the edge after trimming.
A good rule is this: backgrounds can wander out into the bleed, but important content should stay comfortably inside the safe area.
A lot of printers use something like 1/8 inch inside the trim as a practical starting point for safe margins on smaller pieces. But again, the template matters. If you are dealing with rounded corners, custom shapes, tight borders, or anything visually fussy, give yourself more room, not less.
What Cut Tolerance Means
Cut tolerance is the allowed amount of variation in where the cut actually lands.
This is the part people tend to skip, right until they order something with a skinny border and then become spiritually attached to one side being 0.3 mm thicker than the other.
Cut tolerance is not a sign that the printer is sloppy. It is a normal part of physical production. Even excellent equipment has some movement or variance. The point of bleed and safe area is to make that normal variation invisible in the finished piece.
So when people ask why bleed, trim, safe area, and cut tolerance matter, the short answer is this: because paper gets cut in the real world, not inside a perfectly frozen mockup.
How These Four Things Work Together
The easiest way to understand this is with a simple example.
Say your final business card size is 3.5 x 2 inches.
If the printer wants 1/8 inch bleed on every side, your working file becomes 3.75 x 2.25 inches.
Now set it up like this:
- The background extends across the full 3.75 x 2.25 file
- The trim line sits at the finished 3.5 x 2 size
- Important text and logos stay inside the safe area, a bit inward from trim
- The cut can shift slightly without exposing white edges or chopping important content
That is the system.
Bleed protects the edge.
Trim defines the finished size.
Safe area protects critical content.
Cut tolerance is the reason the first three exist.
Why Border Designs Cause Problems
Borders are where people accidentally pick a fight with physics.
A border near the outer edge makes tiny cut variation more obvious. Even when the job is within normal tolerance, the border can look thicker on one side than the other. That does not always mean the print shop failed. Sometimes it means the design asked the cut to look more perfect than physical trimming usually can.
If you want a border, you have a few safer options:
- Make it thicker and more intentional
- Pull it farther in from the edge
- Avoid hairline borders on small printed pieces
- Use the printer’s template instead of guessing
Thin outer borders look clean on screen. In print, they are often a trap.
Common Mistakes People Make
One common mistake is adding no bleed at all.
Another is putting important text into the bleed area, which defeats the point.
A third is treating the final size as the full file size and assuming the printer will figure it out. Some printers will fix basic issues. Some will flag the file. Some will print what you sent and let reality handle the rest.
Other common mistakes:
- placing logos too close to the edge
- using very thin borders near trim
- ignoring rounded corners or custom cut shapes
- assuming a digital proof can show every possible trim shift
- exporting a low-resolution image instead of a proper print file
That last one deserves special mention because it turns a layout problem into a quality problem for free.
A Simple Setup Rule That Usually Works
If you want the plain-English version, use this:
Start with the final size.
Add the required bleed.
Extend backgrounds all the way through the bleed.
Keep important content well inside the trim.
Use the printer’s template when they provide one.
Do not build designs that rely on perfect edge cutting.
That is the boring answer. It is also the answer that saves reprints.
Final Verdict
Bleed, trim, safe area, and cut tolerance are not obscure print-shop jargon for the sake of it. They are the basic layout rules that help printed work survive production without ugly white edges, clipped text, or awkwardly tight margins.
If you remember one thing, remember this:
Bleed is outside.
Trim is final.
Safe area is inside.
Cut tolerance is why you need both buffers.
Once you get that, a lot of print file setup stops feeling mysterious and starts feeling pretty reasonable.